Thursday, October 15, 2015

Severed Finger Tutorial

It's nearing Halloween, my favorite holiday, so I decided to make some fake severed fingers. The video I watched is here.

The detail on the finger is great.

You start off my putting baby powder on one of your fingers (so liquid latex won't stick to it) then cover it with a nice thick layer of liquid latex.


It goeson white, but dries clear-ish. Blow dry this on the cold setting. Put 2-4 more layers of liquid latex on top (3-5 total), thoroughly drying between each layer. I used 3 thick coats and it was enough.

Then start to peel the latex off. Make sure to constantly be brushing baby powder inside and outside the latex as you go so it doesn't stick to itself. 


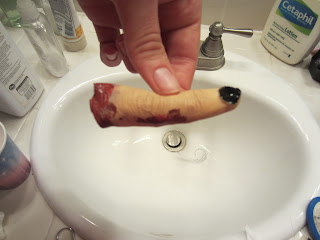
The latex picks up all the details and wrinkles from your own finger, making it look realistic. The wrinles are all inverted, so they stick up rather than being indented, but without close inspection nobody will notice.


In the video she painted the finger with alcohol-based paint which is a really long lasting and expensive body pait. I don't have any, so I just rubbed some foundation on it.


To make the foundation stick better, I finished it off with a few sprays of green marble, which is a setting spray that puts a thin film barrier between the surface and the fingers touching it. 


After it was colored, I painted the nail black, and stuffed it with toiled paper. Stuffing it with cotton balls might work better or be more even, but I didn't have any.


After stuffing it, I used a burgundy colored acrylic paint as the blood. Using fake blood might look more realistic, but I didn't have any. 


 And you're done! I didn't time myself, but I think it probably took 20 minutes or so. I had all the materials on hand, so it was FREE! Using some eye shadow or blush might give the finger a little more dimension, too.


Puzzle

This is actually really old and doesn't belong here, but last Christmas I finished my first puzzle ever in my adult life. I'm kind of proud of that.


Thursday, September 17, 2015

Sybill Trelawney Cosplay Tutorial

Sometimes I just get  hankering to make a costume, and last week I had one of those. I chose to make a costume I've been wanting to make for a long time: Sybill Trelawney from Harry Potter. The finished look:


What Trelawney actually looks like:


The obvious first place to go for her cotume is a thrift store. And that's exactly where I went to get the goods. I finished the costume in about half an hour.

I started with her vest:

This over-the-shirt item for $4.

Cut in half so I can use it as a vest.

These beads dangle and make noise when I walk, which I love.

Next I made her headband:

I found this shirt for $4. It is stretchy.

I cut a strip of fabric and sewed it into a circle.


Perfect!

Thsi also came with the shirt. I didn't use it in the end.

Her skirt:
I'm a size 6-8, this skirt is size 12. It sits very low on my hips, perfect for the costume.

It had two straps around the waist that I sewed backwards.

All the jewelry I bought. Total: $6

A deathly hallows necklace I already owned.

The shirt:
I just picked something the right color that was long-ish sleeved. $5.


 Socks/shoes were Clark Desert boots and some winter socks that I already owned.


I purchased the glasses on Amazon (Nerd Spec Glasses) for $3.50

Now I just had to get my hair really curly and frizzy.


Total spent: $26 and it turned out fabulous! I can' wait to wear it!


Monday, September 7, 2015

Spike Spiegel from Cowboy Bebop Cosplay Tutorial

For 2015 San Diego Comic-Con David went as Spike Spiegel from an Anime show called Cowboy Bebop.


This was a pretty easy/straightforward costume. I did it in one day.

We bought the yellow dress shirt and blue suit coat and slacks from a thrift store. We bought a half yard of lighter blue woven fabric from Joanns.

I started by removing one of the lapels and the collar off the jacket. I then turned in the exposed edges and  sewed the open edge closed. 


Spike's sigle lapel is quite large, so I cut the remaining lapel and spread it out to make it bigger.


I covered the lapel with light blue fabric, and hand sewed it down to the body of the coat so it would stay in place.


The light blue fabric only covers the outside of the lapel, and stops right at the crease.

I used 2 snaps for each strap on the jacket. The straps were hand sewn to the body of the jacket. They are just rectangles of fabric (kind of like a pillow minus the stuffing) with no reinforcement.


You can kind of see the chalk I used to mark on the coat the outline of the straps so I knew where the snaps should go.

I hemmed the coat jacket by cutting it to length, folding it over, and sewing. Very low quality.


The pants already fit him, so I was done!


I actually added some blue fabric to the rolled up cuffs of the jacket. I was sick of the project, so I just hot glued on the light blue fabric. Also, we sprayed David's hair with hair spray color dye.